Contents...
Partners or Transport for Specific Events
Preparing your Bike for Air Travel
How to Hold Your Map
Fitting your Miry Mapholder with Quick-release Mounts
Learning MTBO Techniques
MTBO Organisation and Course Planning
MTBO Mapping
MTBO Rules
ANZ Results
On Other Pages...
Home
How do you Orienteer on a Bike??
NZ MTBO Calendar
NZ MTBO Results
The Australian MTBO scene
The British MTBO scene
Other forms of Orienteering
Other Refs to Mountain Biking
Learning MTBO Techniques
MTBO Organisation and Course Planning
MTBO Mapping
MTBO Rules
ANZ Results
On Other Pages...
Home
How do you Orienteer on a Bike??
NZ MTBO Calendar
NZ MTBO Results
The Australian MTBO scene
The British MTBO scene
Other forms of Orienteering
Other Refs to Mountain Biking
MTBO Mapping
MTBO Rules
ANZ Results
On Other Pages...
Home
How do you Orienteer on a Bike??
NZ MTBO Calendar
NZ MTBO Results
The Australian MTBO scene
The British MTBO scene
Other forms of Orienteering
Other Refs to Mountain Biking
ANZ Results
On Other Pages...
Home
How do you Orienteer on a Bike??
NZ MTBO Calendar
NZ MTBO Results
The Australian MTBO scene
The British MTBO scene
Other forms of Orienteering
Other Refs to Mountain Biking
Home
How do you Orienteer on a Bike??
NZ MTBO Calendar
NZ MTBO Results
The Australian MTBO scene
The British MTBO scene
Other forms of Orienteering
Other Refs to Mountain Biking
NZ MTBO Resources
First of all, make sure you have read the beginners' hints. They are written for bikers taking up MTBO, or foot-orienteers getting onto a bike.
This page is a collection of random items that might help you sometime. At the top are short-term things such as partners or transport wanted or offered. Then come stable things such as equipment ideas, further down is advice for the organiser of a MTBO event or a mapper; the rules of MTBO; and the results of our competitions with Australia. If you have something that could help, or you see a need for some guidance, get in touch with the
Partner or Transport Wanted/Offered
Nothing at present
Preparing your bike for Air Travel
Packing details assembled by
and installed a while ago, um, maybe 2004.
Experiences with NZ-Australia baggage limits
have been assembled by and updated Oct 2010. But these rules are constantly changing, you need to check on the airline websites.
- Within New Zealand. Sometime early this century Air NZ introduced a charge of $25 per direction for carrying bikes. Since then they have relented, or the invisible hand of the market had its effect and "An extra 10kg baggage allowance is given for sporting equipment free of charge. Examples include bicycles, golf clubs, skis, snowboards." (Air NZ website Dec 07.)
- Internationally. It seems that if you go to or through North America they work on the "piece" system, each "piece" can be quite heavy and you probably don't have a problem. Otherwise, they are carried as part of your normal baggage allowance, which is usually 20kg for economy class tickets. Plus you can take 7kg in a carry-on bag. This is not usually checked for weight, but it IS checked for anything that could remotely be construed as a weapon, such as tools. However the Air NZ sporting equipment allowance applies between New Zealand and Australia, the Pacific Islands, Asia, Japan or London via Hong Kong. This makes things much more comfortable, but the other airlines especially the budget ones may have differing policies. And then of course there is the interpretation of the check-in person, which might depend on the fullness of the flight, which side of the bed they got out on, and other random factors. All we can do is report recent experience with baggage limits and invite you to contribute to it.
- Packing. Some people pack their bikes comprehensively (see below), others do only the
minimum (wrap the oily bits) on the basis that its better that the loading staff
KNOW its a bike. Packing is REQUIRED for international flights. You can get bags, and we'll
provide links to suppliers here in due course. You can use a carboard bike box,
free from a bike shop. Below is brief advice from Dianne Michels which is sufficient
to do the job. For a more comprehensive treatment with pictures check out
this website.
- Clean the bike scrupulously esp tires. Both Australia and New Zealand have rigourous biosecurity systems. Try looking for mud under the seat!
- Pedals off, front wheel off, remove handlebars and tie or tape along the direction of the bike, remove seat and post, pack in the sort of bike box that new bikes come in (from bike shop). Bike shop will be able to advise further.
- No longer need to deflate tires although some airline websites still say so.
- Front forks protection - you can get a spacer that protects them. Derailleur protection - put chain onto biggest cog, zip-tie a cheap plastic pudding plate over the guts.
- The spindle can come out of the front wheel so that it doesn't poke through the box.
- Reduce weight by leaving behind anything that you can get over there such as spare tubes.
- You can put soft gear around the bike but not heavy stuff as it could come loose and rattle round in the box.
- In theory the weight limit (except North America) is 20kg with blind eye turned to 5kg over, and the bike is one of your two items. Obviously there is some discretion, you might reduce the chance of getting charged for excess baggage by checking in half an hour earlier than otherwise. If you are travelling with a non-biker, check in together so that your weights can be considered together.
- Put as much weight as poss into your carry-on bag, but remember that these are screened for stuff that could be regarded as weapons, tools are probably nogo in there. And note that carry-on may be weighed now too.
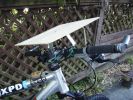
How to Hold Your Map
Written by and updated 24 Sep 09.
You can't hold it in your hands! A mapbag round your neck will twist and end up strangling you! The best place is on the bars.
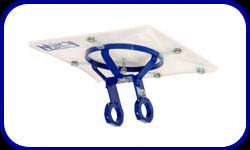 The state of the art is made in Czech and is called the Miry Pro.
Lightweight materials, strong and stable, and most importantly it has a rotation
mechanism so you can align the map with the way you are going.
Check it out at The MAPsport Shop
and look down the bottom of "Miscellaneous Products".
MAPsport also sells a nifty system that lets you put a magnetic pointer where you are on
the map.
The state of the art is made in Czech and is called the Miry Pro.
Lightweight materials, strong and stable, and most importantly it has a rotation
mechanism so you can align the map with the way you are going.
Check it out at The MAPsport Shop
and look down the bottom of "Miscellaneous Products".
MAPsport also sells a nifty system that lets you put a magnetic pointer where you are on
the map.
 If you want an cheap mapholder while you see whether you like this crazy sport,
make one! Lots of people have devices made from clipboards, hoseclips, cable-ties and spring-clips.
Here are some that even rotate! Download Di's design
If you want an cheap mapholder while you see whether you like this crazy sport,
make one! Lots of people have devices made from clipboards, hoseclips, cable-ties and spring-clips.
Here are some that even rotate! Download Di's design
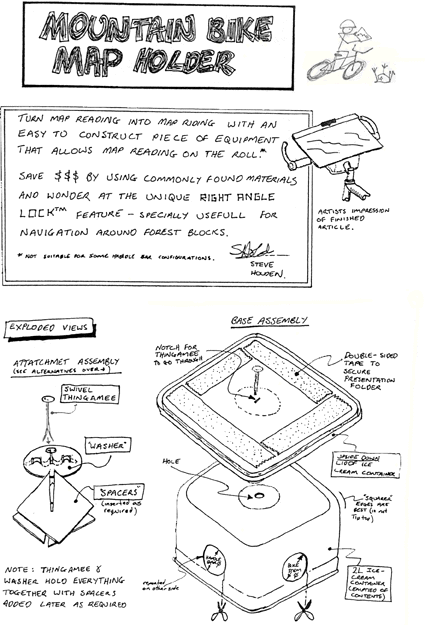 And here's one by Steve Holden formerly of Wellington OC. Warning: may be bad for your health, requires consumption of 2 litres of icecream first...
Click on the sketch for the instructions. Prints better than it looks on-screen.
And here's one by Steve Holden formerly of Wellington OC. Warning: may be bad for your health, requires consumption of 2 litres of icecream first...
Click on the sketch for the instructions. Prints better than it looks on-screen.
Here's a website with two more designs. Alternatively try
this design or
that design.
Fitting your Miry Mapholder with Quick-release Mounts
Prepared by
of Auckland, New Zealand, Ph 021 239 3649 or 09 473 6434.
Installed a while ago, um, guess 2004
- These are light mounts that come with the BL913HF or BL913HFSC set of Smart lights (Local bike shop will be able to help you out). You are only needing a replacement bar mount x2. It is very simple proceedure to remove the existing clamps and replace them with the light mounts. I have replaced the plastic hinge pin on the mount with a nut and bolt as the pin tended to work loose and come out. The bolt supplied fits through the top of the mount and the aluminium on the map board but it pays to lock tight this on.
- To fit the mounts I removed the rivets that connect the old bar attachments (save these you never know if they need to be put back on).
- Next I shaved down the plastic by the bolt hole on one side where the smart light mount sits against the aluminium to get a nice snug fit.
- Position the mount so it rests snugly against the aluminium at the bottom and then drill a 4mm hole through the aluminium on the map holder to secure the mount.
- Bolt the mount on and then secure the whole thing with a small zip tie through one of the original holes at the bottom of the map holder and around the mount.
- Bingo! You're on your way!
Learning MTBO Techniques
Written by and installed on 5 Apr 09.Since 2008 Orienteering Hutt Valley has run MTBO events specially for beginners. They use the public land along the Hutt riverbanks - flat terrain, limited route choice, larger scale than usual. They consist of an untimed course of about 1km (to bring riders back for help and encouragement) and a timed course of 5-6km (along the riverbank, across a bridge and back on the other side). They were nicknamed "Brownie Events" - serious riders get "brownie points" at home by bring kids/partner - and riding level suitable for brownies.
OHV has decided to declare some of its maps free for personal and school use, and has put pdf versions of them in a download area on its website. The are also suitable as examples for the simple courses and terrain used. Rather than list the names of the files, we link here to the OHV download page so you can get the latest files. Find them by searching the download page for "MTBO".
One of OHV's beginner events from 2010 contains some very good lessons for beginner riders. Experienced bike-orienteer Michael Wood has noted the features that he would look for on this course, together with some navigational techniques he would use. Print off the map here, and then read
Michael's hints.
MTBO Organisation and Course Planning
Written by Latest information at the top.
After the 2014 W2W Carnival we started assembling recommendations for event organisers. This is not yet comprehensive, at this stage just a bare list of items and a basis for further work. Find it here.
- Observations from the First World MTBO Champs, 1 Sep 02
- Lessons from the First NZ MTBO Champs, 17 Dec 00
- MTBO Course Planning Hints, 31 Jul 00
MTBO Mapping
Written by Latest information at the top.July 2014: After the 2014 W2W Carnival we reviewed and approved a new version of the "NZ MTBO Mapping Conventions." Changes are fairly detailed, and the same Sample MTBO Legend" is still relevant.
Mar 2014: Conversion of a Foot-O map to MTBO.
Preparation for the W2W Carnival involved mapping an area at Rotorua for both foot-o sprint and MTBO sprint. The map was first drawn for foot (ISSOM) and then converted to MTBO (no international spec yet). The main issue in the fieldwork was to distinguish white forest for foot into "also suitable for off-track riding" and "not suitable". It is assumed that bright yellow for foot means suitable for riding while pale yellow and its variants mean not suitable. Here is a Checklist for Conversion to MTBO of the foot-o file. Although geared to a 1:5000 sprint map, it might be useful for converting other foot-o maps.
Feb 2014: After the 2012 Otago Carnival we reviewed and approved the "NZ MTBO Mapping Conventions" and used them (mostly) for the 2014 W2W Carnival. A few variations were called for by the overall controller. The MTBO Committee will shortly review the conventions and exceptions with this latest experience. These conventions are illustrated here in a Sample MTBO Legend". They are represented here in an OCAD version 8 file.
Jan 2013: we have acquired an English translation of a Swedish publication: Converting O Maps to MTBO Maps. It is a simple summary suitable for someone who hasn't done it before. Of course it doesn't say anything about NZ conventions, see below. Here it is.
The situation in Dec 2011
A new edition of the International Specifications for MTBO Maps came into effect in 2010. Australia and NZ had already adopted the most significant change, showing tracks in four speeds instead of three. Here's a summary of the changes (minor updates made 14 Jul 10).
These specifications are fairly unsatisfactory in the area of off-track travel. Various countries allow it, some allow it with bizarre restrictions (carrying the bike), and some don't allow it at all. The above specifications contain an appendix with four suggested ways of showing places where off-track travel is allowed. They all have disadvantages.
In NZ we see a need for limited off-track travel to be allowed, mainly to clarify those areas where it isn't clear what is a track, and to prevent temptation where tracks come very close together. And fairness demands that the rider can tell the speed of off-track options relative to tracks. The MTBO Committee has assembled some "NZ MTBO Mapping Conventions" which it thinks will be an improvement. There are also some small symbol dimension changes. They are illustrated here in a Sample MTBO Legend". These haven't been formally endorsed by the federation yet, but will be used during the Otago MTBO Carnival and reviewed afterwards.
Earlier notes in mid 2009.
In 2007 a revised MTBO Mapping Specification was approved and you can download it from the Mapping Commission website. This means that the version in the little booklet ISOM 2000 is out of date. The revision still contains many words relating to foot-orienteering eg "runnability"!!!
Since then the Australians have revised their thinking and instead of wanting more widths they have moved to more speeds: the 4X2 system. This provides two speeds instead of one to cover the wide range between fast and unrideable. They are represented by long and short dashes. They have found support in the IOF MTBO Commission but the measure has been blocked by the IOF Mapping Commission. The NZOF MTBO Committee supports "4X2" and maps are being progressively changed over.
Another principle which is being discussed is to beef up the contour widths - after all most foot-o maps are 1:10,000 and have 150% contour widths. And if contours why not streams? The visual situation is surely more demanding on a bike.
Earlier notes mid 2003.
Here are a couple of proposals which have not yet been accepted by the Mapping Commission. They are word files that you can download.
- Slovakian proposals for some colour changes
- The Australians are convinced that your need eleven different track symbols but the IOF MTBO Committee and the IOF Mapping Commission are doubtful. The Aussie view
- The NZOF MTBO Committee made a submission to the IOF on the above. The NZ view
Here are some NZ mapping comments dated 20 Dec 02 following the 3rd NZ MTBO Champs in 2002. They are mostly about the colour for forest.
Here are some NZ mapping comments dated 29 Aug 02. They are mainly about the dimensions for the track symbols.
Earlier notes mid 2002.
The official specification for MTBO maps is still under development, with the organisers of the first World Champs making some changes to the standard contained in the 2000 edition of the International Standard for Orienteering Maps. The IOF Mapping Commission has published two interim amendments. They still have too much baggage related to foot-orienteering, so I would expect further change.
MTBO Rules
Section written by and updated on 8 Jul 14.NZ ran MTB-Orienteering for about 15 years without a set of rules. Practice generally followed other countries, but there are some big variations, particularly about going off-track. The NZOF MTBO Committee has formulated a set of rules and some guidelines for championships, dated November 2011. After the Otago MTBO Carnival it revised them, dated April 2012. The NZ Orienteering Federation has endorsed the April version so these are now official.
So the documents that govern this corner of orienteering are:
- NZ MTB-Orienteering Rules dated July 2014. Designed to be rider-friendly. Revised version awaiting endorsement by the NZOF council.
- NZ MTB-Orienteering Rules dated Apr 2012. Strictly speaking this version is still in force but see above.
- NZ MTBO sample map with legend. Designed to be rider-friendly.
- The NZ foot-orienteering rules, which contain a lot of stuff that applies to all types of orienteering. Rather weighted towards organisers' obligations however.
- The IOF MTB-Orienteering rules. These too are weighted towards organisers' obligations, particularly for international competition.
- NZ MTBO Mapping Conventions dated Oct 2011. This is aimed at map-makers, and refers to....
- International Specifications for MTBO Maps aimed at map-makers.
- Also for mapmakers, an OCAD version 8 file with the NZ versions of the symbols.
- Rules for the ANZ MTBO Challenge These are the contest rules discussed by the NZ and Australian MTBO committees during 2008, formally proposed by NZOF on 2 Feb 09 and accepted by OA on 15 May 09. In 2010 the two federations agreed that a planner, controller or coordinator for a challenge event may be replaced by a named reserve; and in 2012 the requirement for team members to ride first was dropped. We haven't been given a NZ version of the latest, but are confident that the Australian version (above) represents the rules.
- The MTBO Challenge Rules draw on the Rules for the ANZ Foot-O Challenge for generic stuff such as team size, eligibility, and notifications between the two countries.
ANZ Challenge Results
Section written by and updated on 16 Jan 14.
Often only the individual results find their way into the archives. Here's a collection of the team results, with links to other records where available. The result is generally based on the best two individual results from each side, except as noted. In the early years the best four results were used in the open classes.
- Jan 2014 held in Auckland/Rotorua, New Zealand; result NZL 23.5, AUS 8
The 0.5 arises from an agreement to count W70 at half rates as both countries had a single team member. The definitive checked result is here. A summary follows.- Mid dist Men -20: NZL 104-24 AUS 124-46
- Mid dist Open Men: NZL 111-51, AUS 123-03
- Mid dist Open Women: AUS 193-22, NZL no result
- Mid dist Men 40: NZL 109-00, AUS 135-53
- Mid dist Women 40: NZL 121-10, AUS 181-50
- Mid dist Men 50: NZL 102-47, AUS 118-01
- Mid dist Women 50: NZL 120-22, AUS 150-48
- Mid dist Men 60: NZL 119-45, AUS 119-48
- Mid dist Women 60: NZL 88-28, AUS 132-39
- Mid dist Men 70: NZL 92-57, AUS 95-42
- Mid dist Women 70: AUS 43-51, NZL 50-35
- Spr dist Men -20: NZL 43-35, AUS 50-02
- Spr dist Open Men: NZL 52-14, AUS no result
- Spr dist Open Women: NZL 55-08, AUS 89-59
- Spr dist Men 40: NZL 53-14, AUS 67-22
- Spr dist Women 40: AUS 72-14, NZL 88-25
- Spr dist Men 50: AUS 59-04, NZL 60-37
- Spr dist Women 50: NZL 75-02, AUS 81-46
- Spr dist Men 60: AUS 69-28, NZL 73-06
- Spr dist Women 60: NZL 68-03, AUS 70-35
- Spr dist Men 70: AUS 69-29, NZL 70-24
- Spr dist Women 70: NZL 46-57, AUS no result
- Long dist Men -20: NZL 153-26, AUS 165-25
- Long dist Open Men: NZL 162-59, AUS 176-02
- Long dist Open Women: AUS 279-00, NZL no result
- Long dist Men 40: NZL 166-50, AUS 188-16
- Long dist Women 40: NZL 182-25, AUS 220-50
- Long dist Men 50: NZL 155-39, AUS 163-43
- Long dist Women 50: NZL 165-04, AUS no result
- Long dist Men 60: NZL 144-10, AUS 157-08
- Long dist Women 60: NZL 126-09, AUS 154-24
- Long dist Men 70: AUS 129-33, NZL no result
- Long dist Women 70: AUS 65-21, NZL no result
- Jan 2012 held in Central Otago, New Zealand; result NZL 14, AUS 10
- Spr dist Men -20: AUS 58-53, NZL no team
- Spr dist Open Men: NZL 53-32, AUS 55-18
- Spr dist Open Women: AUS 61-56, NZL 62-37
- Spr dist Men 40: NZL 55-34, AUS 59-15
- Spr dist Women 40: AUS 63-27, NZL 66-02
- Spr dist Men 50: NZL 63-15, AUS 66-27
- Spr dist Women 50: NZL 79-06, AUS no result
- Spr dist Men 60: NZL 44-14, AUS 53-31
- Long dist Men -20: AUS 234-50, NZL no team
- Long dist Open Men: NZL 245-09, AUS 284-50
- Long dist Open Women: AUS 253-01, NZL 275-08
- Long dist Men 40: NZL 223-49, AUS 231-23
- Long dist Women 40: NZL 249-02, AUS 250-01
- Long dist Men 50: AUS 211-46, NZL 255-47
- Long dist Women 50: NZL 237-07, AUS 250-41
- Long dist Men 60: NZL 175-25, AUS 212-51
- Mid dist Men -20: AUS 88-16, NZL no team
- Mid dist Open Men: NZL 104-53, AUS 111-34
- Mid dist Open Women: AUS 90-56, NZL 95-07
- Mid dist Men 40: NZL 83-41, AUS 98-03
- Mid dist Women 40: AUS 113-39, NZL 115-36
- Mid dist Men 50: AUS 92-20, NZL 103-29
- Mid dist Women 50: NZL 98-46, AUS 106-46
- Mid dist Men 60: NZL 73-07, AUS 88-58
- Jun 2009 held at Mt Gambier, Australia; result NZL 13, AUS 8
- Spr dist Open Men: AUS
- Spr dist Open Women: ???
- Spr dist Men 40: ???
- Spr dist Women 40: ???
- Spr dist Men 50: ???
- Spr dist Women 50: ???
- Spr dist Men 60: AUS
- Mid dist Open Men: AUS
- Mid dist Open Women: ???
- Mid dist Men 40: ???
- Mid dist Women 40: ???
- Mid dist Men 50: ???
- Mid dist Women 50: ???
- Mid dist Men 60: AUS
- Long dist Open Men: AUS
- Long dist Open Women: ???
- Long dist Men 40: ???
- Long dist Women 40: ???
- Long dist Men 50: ???
- Long dist Women 50: ???
- Long dist Men 60: NZL
- Nov 2007 held at Newcastle, Australia; result NZL 11, AUS 10
- Spr dist Open Men: AUS
- Spr dist Open Women: ???
- Spr dist Men 40: ???
- Spr dist Women 40: ???
- Spr dist Men 50: ???
- Spr dist Women 50: ???
- Spr dist Men 60: AUS
- Mid dist Open Men: AUS
- Mid dist Open Women: ???
- Mid dist Men 40: ???
- Mid dist Women 40: ???
- Mid dist Men 50: ???
- Mid dist Women 50: ???
- Mid dist Men 60: AUS
- Long dist Open Men: AUS
- Long dist Open Women: ???
- Long dist Men 40: ???
- Long dist Women 40: ???
- Long dist Men 50: ???
- Long dist Women 50: ???
- Long dist Men 60: NZL
- Jan 2005 held in Auckland, New Zealand; result NZL 6, AUS 1
- Long dist Open Men: NZL
- Long dist Open Women: NZL
- Long dist Men 40: NZL
- Long dist Women 40: NZL
- Long dist Men 50: NZL
- Long dist Women 50: NZL
- Long dist Men 60: AUS
- Sep 2003 in Victoria, Australia; result AUS 4 NZL 0
- Long dist Open Men (best 4): AUS 360-57, NZL 462-39
- Long dist Open Women (best 4): AUS 329-20, NZL 376-25
- Long dist Vet Men: AUS 165-44, NZL 177-28
- Long dist Vet Women: AUS 193-39, NZL 214-31
- Unofficial Jan 2002 in Manawatu, New Zealand; result AUS 2 NZL 1
- Mid dist Open Men: AUS 360-57
- Mid dist Open Women: NZL
- Mid dist Veteran: AUS
This page is maintained by .
Back to the MTBO home page.